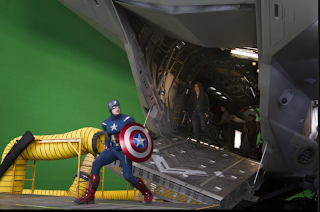
Today we had a go at using green screen. Green screen is a technique used often
in film, tv and photography for special effects purposes. It is used to
separate the subject from the background and give a clear-cut outline, they are
then easy to ‘cut’ around and place wherever necessary. In photography such as
advertising this can be useful to scale objects, place them on a white
background, or to photograph a background at a later date.
In film it is used where actors have to react and act alongside CGI characters, or in CGI scenes that would be impossible to film in real life, as they don’t actually exist.
In tv it is used for news and weather reports for example, to superimpose news stories and weather graphics behind the broadcaster.

Green Screen being used on set of the 2012 film release The Avengers.
Weatherman stood in front of green screen with superimposed weather graphic.
In the studio we used
an improvised green screen using green fabric hung on a backdrop stand approx.
6 feet behind the subject. We then took turns to stand in front of the screen
and have our photograph taken under a simple lighting set up; in Photoshop we could then apply whatever background we wanted.
It is important to note that the subject MUST NOT contain the background colour (in our case, green). If it does, you must change your screen colour to one that is not intended to be seen in your image, or use a different colour object; the typical colours for this technique are blue and green.
It is important to note that the subject MUST NOT contain the background colour (in our case, green). If it does, you must change your screen colour to one that is not intended to be seen in your image, or use a different colour object; the typical colours for this technique are blue and green.
Here are some I made using backgrounds from Google images:
We did a very simple example of this technique. To get the
results shown, follow these simple steps:
Open the image in Photoshop, click on ‘select’ from top menu bar, then ‘colour range’.
A box will pop up with three pipette style icons. Use the first pipette to pick
the colour you want to select, in this case the green background.
If the background is not evenly lit you will then have to choose the pipette
with a + symbol next to it, click the rest of the areas of the background until
it is all selected in the mask window.
Click ok and Photoshop will select the background, invert
the selection, and then go to
'select' > ‘refine edge’ to tweak the selection parameters
to your liking.
Then you can create your selection as a new layer and place it wherever you
want.
To get the most realistic results from this technique, you should make sure
your background and subject are lit similarly. If the subject is too bright and
the background too dark or vice-versa, the image as a whole won’t look correct
even if both images are ok on their own. If you are including full length shots, the horizon line needs to be the same in both images or it will look odd and be obvious that the image is not real.
When making selections, if you are using a real green screen that is evenly lit, you can select your subject with just one click down
to the tiniest hair and avoid having issues with soft edges/green being left
over.
Here is an excellent example of a use of green screen by photographer Nathan
Walton:
To go to the next post, click here


No comments:
Post a Comment